Montessori Sewing Works by Aimee Fagan, author of Sewing in the Montessori Classroom: a practical life curriculum

If I had to pick just one type of work to stock my practical life shelves with, it would be sewing. I am NOT an accomplished sewer. Actually, I think it has been over a year since I pulled out my sewing machine, and then I prefer to make clothing with elasticized waists. But, when it comes to the classroom, I think nothing beats handwork.
Maria Montessori stated that the activities of practical life should be meaningful, looking around my classroom, I wanted to find activities that still had meaning for today’s children. Polishing is great, but how many children really see their parents polishing the silver place settings? Spooning, tonging, pouring, and the like are quickly mastered when we leave the lessons simple and isolated on the tray. What materials could we use that would appeal to the 3-year-old and remain enticing through age 6 or beyond? Sewing.
A child’s engagement with practical life materials is what prepares him for later success in the classroom. These handwork activities directly tie into the main goals of Montessori practical life works — coordination, concentration, independence, and a sense of order. These truly are the most important goals of Montessori pedagogy. Without a strong foundation in practical life, the child won’t have the necessary skills to be able to do the bank game, the moveable alphabet, and such. Through my observations in my class, I always find that sewing works produce the deepest moments of concentration of any of the practical life works I have available.
Set-up
We group our sewing works into four
general categories — preliminary
activities, early sewing, intermediate sewing, and advanced. We do follow a
sequence, where different lessons build on one another, and the child does have
to master some skills before moving to the next lesson. At the moment we have
over 30 sewing lessons and projects that we use in our classroom.
As you can tell, I really like
sewing, and because of this, we have an entire sewing shelf in our classroom.
Do you need a whole shelf? No, not at all, these works can easily be
incorporated into an existing practical life area or an art area.
Last year, for our class of 22
children, we had two dedicated sewing trays and then about 4 to 6
self-contained sewing works on the sewing shelf at any given time. Depending on
your home or class, you can adjust as needed.
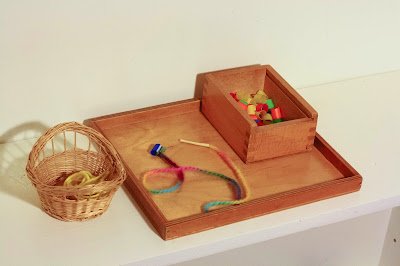
Basic materials:
• Sewing
Trays - Scissors, embroidery thread, magnet, needle threader, needle (sharp
enough to go through felt and with a large eye), a dish to hold all the little
pieces, and a pin cushion
• Assortment
of felt, cloth, buttons, and various colors of embroidery floss, all in
different containers. These are added to the shelf as we introduce new works
that need the materials.
• Trays
for self-contained works
Necklace Making
This seems like such simple work,
but I think it is an important part of our sewing curriculum. It is a work that
some of our youngest children can do right at the beginning of the year, and as
we increase the difficulty by changing the beads and the thread, it remains relevant
— and really what child
doesn’t love to make a
necklace.
Materials:
• Prepared
strings in a container on the shelf. I measure the string to fit my neck, that
way they are always long enough. Tie one bead to the end of the string, and
place a piece of tape on the other end.
• Container
with beading materials on a tray.
Presentation:
• Invite
the child to the lesson.
• Show
them how to take a string from the container (we leave the sting container on
the shelf) and take the tray to the table.
• Holding
string in the subdominant hand, use the dominant hand to add beads to the necklace.
• Help
child tie necklace.
Notes:
• We
do not limit the number of beads a child can use.
• We
start the year with yarn and wide straws. Then we move through regular straws,
large pony beads, smaller pony beads, Perler beads, and mixed beads. For
the string, we go from tape-tipped thick yarn to thinner yarn and finally
elastic string.
• We
do help children tie their necklaces, but each time we do it we show them, as
a mini-lesson.
• By
the end of the year we like to have a container with a spool of elastic
thread and a pair of scissors on the shelf. The child can then cut their own
thread and prepare the necklace on their own.

Age: 2.5+
Sewing Cards with PostCards
Materials:
• A container holding postcards (or the front of greeting cards). The cards have holes punched around the edge and a length of yarn tipped with tape and attached to the postcard.
Presentation:
• Invite the child to take a postcard from the basket.
• Take the material to the table.

• Holding the card in the subdominant hand, use the dominant hand to go “up from the bottom, down from the top,” through the pre-punched holes, demonstrating a running stitch.
• Invite the child to try.
• Child can take home the postcard when finished.
Notes: Most likely, the child will not sew perfectly along the edge when they start this work, and that is fine! It is just a reminder that next time we see the child choose that work, we might want to come over and sit and simply say, “Up from the bottom, down from the top” for a few of the stitches and then allow them to practice on their own.

Age: 2.5+
Threading a Needle
Some years we have set this up as a
self-contained activity, but there are plenty of years that we just incorporate
this into the early sewing works. It doesn't matter how you want to use it, the
basic lesson remains the same.
Materials:
• Pincushion or cork
• Needle
with large eye
• Needle
threader
• Precut
length of thread (if this is being used as a stand-alone work)
• Magnet
(optional, to hold needle and needle threader)
• Small
dish for magnet
• Tray
to hold materials
Presentation:
• Invite
the child to the lesson and take the tray to the table.
• Holding
the needlepoint out the eye and naming it. I say, “This is the eye, it’s
not like our eye, but it’s
the same word.”
• Place
the needle in the pincushion, showing that the eye is still up.
• Take
the needle threader in the dominant hand and slide the large hook through the
eye — do not let go of the
needle threader.
• Pick
up the thread with the subdominant hand, and place it over the hook with about a
two-inch tail at one end.
• Using
the dominant hand that is still holding the needle threader, pull the hook of
the needle threader back through the eye, and until one end of the thread has
come through the eye, you will have to brace the needle with the subdominant
hand.
• Point
out that there is an end of the thread on each side of the eye.
• Remove
the threader, and invite the child to try it.
Notes:
• This
is a hard task to master, often with younger children, I place my hands over
their hands as they guide the needle threader through the eye, and I help them
keep it steady as they place the thread on the hook.
• The
hook can get caught on the side of the needle, I try to show the child what has
happened (otherwise they just keep pulling), and then we push the needle
threader back through and try to remove it again slowly.
• We
don’t require perfect
mastery of needle threading before the child moves on, but we do have them
practice as often as possible. If they are still struggling, we have the ask an
older child to hold, or if we are available, we will represent the lesson.
Tying a Knot for Sewing
Again, this is not a work we set up as a self-contained lesson every year. Usually, I just give the knot-tying
lesson as part of the early lessons on sewing. If a child can’t tie a knot when they have
finished their sewing, they come to a teacher or an older child and we do this
as a mini-lesson with their work. The above video gives you somewhat of an idea
of how we help the child with the initial lesson.
Materials:
• Pincushion or cork
• Needle
with large eye
• Needle
threader
• Embroidery
floss wrapped on a plastic bobbin
• A
pair of scissors
• Magnet
(optional, to hold needle and needle threader)
• Small
dish for magnet
• Tray
to hold materials
Presentation:
• Invite
the child to the lesson and take the materials to the table.
• Measure
the thread and cut. We use the measurement of the length of the table or the
length of the child’s arm — it ends up beginning about 20
inches. Based on your environment, you can adjust your method of measuring the
thread.
• Thread
the needle.
• Remove
the needle from the pincushion.
• Holding
the ends of the thread in the dominant hand, make sure they are even and the
needle is in the middle of the thread.

Now, also in the dominant hand, grab the end of the needle by the eye:
• With the subdominant hand, grasp the hanging floss in the middle.
• With the subdominant hand, wrap the floss around the needle three times.
• Now hold the tip of the needle with the subdominant hand.
• Slide the dominant handgrip up to include the thread that was wrapped around the needle.
• Holding the tip of the needle with the subdominant hand, slide the dominant hand (which is holding the wrapped thread) off the end of the needle and to the end of the thread.
• Cut the knot and return the materials to the tray, or start sewing
Notes:
• This
is one of the lessons that I usually do interactively, rather than
the traditional Montessori way of the teacher presenting the whole lesson, and
then inviting the child. Since it is so complex, I find that children tend to
master it faster if we do it together, and I use my hands to guide them — hand over hand.
• This
is a challenging lesson, and again if a child hasn’t mastered it, we just continue to give this mini-lesson
in whatever sewing work they are doing.
• If
a child develops another way of tying a knot, fantastic!
Stitching prepared shapes,
Introducing a Hoop
Materials:
• A
prepared sewing tray
• A
collection of fabric (can be burlap or regular broadcloth) with basic shapes
drawn in marker
• A
variety of embroidery hoops — I
prefer the sturdy plastic ones, but any will do.
Presentation:
• Invite
the child to the lesson, gather the materials, and take them to the table.
• Have
the child thread the needle and tie a knot, help as needed.
• Demonstrate
how to open the embroider hoop — close
it and invite the child to open it.
• Lay
the bottom hoop on the table, and then place the cloth on top. Push the second
hoop over the top and tighten the hoops.
• Hold
the hoop in the subdominant hand and the needle in the dominant hand.
• Sew
up from the bottom, following the line for the shape.
• Continue
to sew along the line.
• Tie
a knot when finished.
• Remove
embroider hoop.
• Return
the materials to the shelf.
Notes: Usually, I demonstrate “missing” the line when coming up from the bottom and then pulling
the needle out to reposition the needle on the line.

Age 4+
Pillow Making
Materials:
• A
prepared sewing tray
• To
start we have precut felt, in squares and circles, that are safety-pinned
together. Once the work has been out for a while, we move to fabric with the “right” sides pinned together. Towards the end of the year, we also
have a collection of fabric and safety pins, so children can design their own
pillows
• Black
marker
• A
container holding poly-fil
Presentation:
• Invite
the child to the lesson, and take all the materials to the table.
• Have
the child thread the needle and tie a knot.
• Using
the marker, draw a line around the pillow, about 1/4 of an inch from the edge.
Do not connect the line, rather leave a 1-inch space between the two ends. This
step is only necessary when a child is new to pillow sewing, once they are used to the idea that they have to stop short so they can stuff the pillow, it is no
longer needed.
• Show
the child to start at one end, and use a running stitch to sew along the line
to the other end.
• Once
the child has reached the other end they tie a knot.
• Remove
the safety pin and set it to the side.
• Felt
Pillow - Stuff the pillow with the poly-fil.
• Fabric
Pillow - Turn the pillow right side out by pushing it through the opening. The
child will most likely need help with this the first few times. It can be
helpful to have an orange stick to help poke the cornets out. Then stuff with
poly-fil.
• Have
the child re-thread the needle and tie a knot.
• Sew
the pillow closed.
• Return
the materials to the shelf — have
a space to collect safety pins.
Age: 4.5+
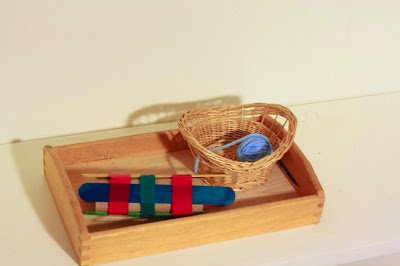
French Knitting


Materials:
• Toilet
paper tube with four or more popsicle sticks taped securely to the side
• Yarn
Basket
Presentation:
• Invite
the child to the lesson, and take the materials to the table.
• Thread
the end of the yarn all the way through the tube so it peeks out at the end.
• Starting
with the pop. stick at 12 o’clock, and wrap the yarn around once in a clockwise
direction.
• Move
to the stick at 9 o’clock and wrap in a clockwise direction.
• Repeat
for the 6 o’clock stick.
• Same
for the 3 o’clock stick – (it
should look like a square spider web).
• To
knit, have the child place the yarn over the next stick on the outside of the
tube (continuing to work counterclockwise) and then pull the bottom yarn over
the top yarn and off the pop. stick.
• Continue
in a counterclockwise direction (it is easy and natural for the child to hold
the tube near their stomach and turn the tube as they work.
• To
finish, cut the working end from the ball, and then thread the end under the loop
and then remove the loop from the stick. Repeat for all sticks.
• To
make it really secure, I then loop the end through the last loop that was
removed and tie a knot.
Notes:
• For
a while we help the child get set up and usually help them make the first round
of stitches. We do allow them to do as much as they can, moving
from actually doing the set-up for them, to taking them through it.
• I
use this story that reinforce the work that they are doing. The child is a
sheep farmer and the first loop on the stick is the sheep, and then the child
builds a fence (lay the yarn across the stick, above the first loop), but the
sheep jumps over (move the lower loop over top loop) and this continues around the
knitter.
Aimee Fagan is a Primary Montessori teacher, blogger, and author of Sewing in the Montessori Classroom: A Practical Life Curriculum. She lives in Virginia with her
husband, her 14-year-old stepdaughter, a 5-year-old daughter, a scruffy dog, and two
new hermit crabs. You can follow her on the Montessori Works blog.